
Introduction
Welcome to the first article in The Kit Locker, the area of the blog where we take the time to chat about kit without looking through the lens of reviews. Don’t get me wrong – reviews are a cornerstone of the blog and I enjoy doing them, but it’s also nice to do step away and do something less restrictive sometimes. I thought I should kick things off with an overview of my Direct Action (‘DA’) loadout as it currently stands, and I will post future updates as and when there are substantial iterative changes to my kit.
These posts will be by no means a review of anything featured, but more a bit of an insight into the choices I have made and why I have made them in developing this kit. Naturally, that means there will be a little overlap with some of the content in the Top to Toe series, where some of the thought processes we talk about there are exemplified in how I’ve decided to build this kit up.
If I were to discuss in the necessary detail everything I wear from head to foot, you’d be reading this article for a full week – as such, only load-bearing equipment, comms, and PPE will be covered in any meaningful detail here, and even the latter elements will be split into a second volume! I will do a completely separate article on things like clothing and footwear in the future, and my weapon builds will also be featured independently in time. The final quick note is that, unavoidably, the structure of the article might make it seem like each and every decision was taken in isolation and in a particular order. That wasn’t at all the case – obviously, I considered elements together and relative to others, and never really took decisions in isolation; it would be almost impossible to build out a kit that worked well in combination otherwise.
The context of this loadout
It makes sense to touch on the context of this loadout as a backdrop for the decisions which informed how I put it together. I was in the fairly unusual position of starting with no kit whatsoever (since I sold everything when I had to stop playing last time), so building a loadout from complete scratch, while carrying the benefit of a number of years playing and a good knowledge of my preferences in the back of my mind.
The first thing, then, was really deciding what I wanted this kit to do. I knew I wanted a gas rifle for a change (though I will be doing an AEG build around my recce kit – watch this space), so that meant I had to be able to carry a combat load of six magazines on my kit (plus one in the gun) to even compete with other players in the field. Being a DA kit, this would also be more geared towards indoor and urban fighting, where body armour would be most prevalent in the real world. That pushed me towards a plate carrier.
As I’m coming back from a spinal injury, I don’t really want the entire weight of my kit on my shoulders pushing down my spine. My hips and legs are stronger than my back is, so it definitely made sense to run a reasonably comprehensive belt line to split the total weight out as evenly as possible. I also don’t want any of that weight on my hips bouncing around as I move, so a two-part shooter’s belt secured by Velcro was a must.
Finally, my kit has to fit in with certain realities of my wider life. I live centrally in a big city, so space comes at a premium and our home doesn’t have a huge amount of room for me to store kit. That means I’m essentially restricted to one large bag for the bulk of all of my kit (the 5.11 SOMS – review to follow), so I have to create something which can be stored in that space.
The baseline requirements, then, could be distilled into a few key components:
- A plate carrier/ shooter belt combination,
- Primarily geared for DA work, but which should be versatile enough to work across the board in a pinch; but
- Which can’t take up a significant amount of space.
The plate carrier
In terms of support and weight distribution, a harness style plate carrier (like the Crye AVS) reigns undisputed champ; unfortunately, they tend to be very bulky which meant I had to rule them out. I wanted whatever plate carrier I went for to have a fairly rigid cummerbund to help with weight distribution and minimise sagging under load. I was almost going to pull the trigger on the Crye Precision SPC when I saw the C2R Fast ‘Fulcrum’ plate carrier had launched. I owned one of C2R’s first generation C2R-MOR Ultralite carriers back in the day, so I was in no doubt as to the quality of their kit. The Fulcrum’s initial reviews were also very good.
I'll post a full review of the Fulcrum after I’ve had more time with it, but the headlines are that it’s a fairly lightweight plate carrier with a semi-rigid cummerbund, designed to have as much inter-brand compatibility of placards and cummerbunds as possible. This was very attractive to me as it meant I wasn’t restricted to the Crye Precision ecosystem (however good it undeniably is) in the way I would have been with the SPC. C2R as a company were also totally phenomenal to deal with from start to finish – thanks, guys!
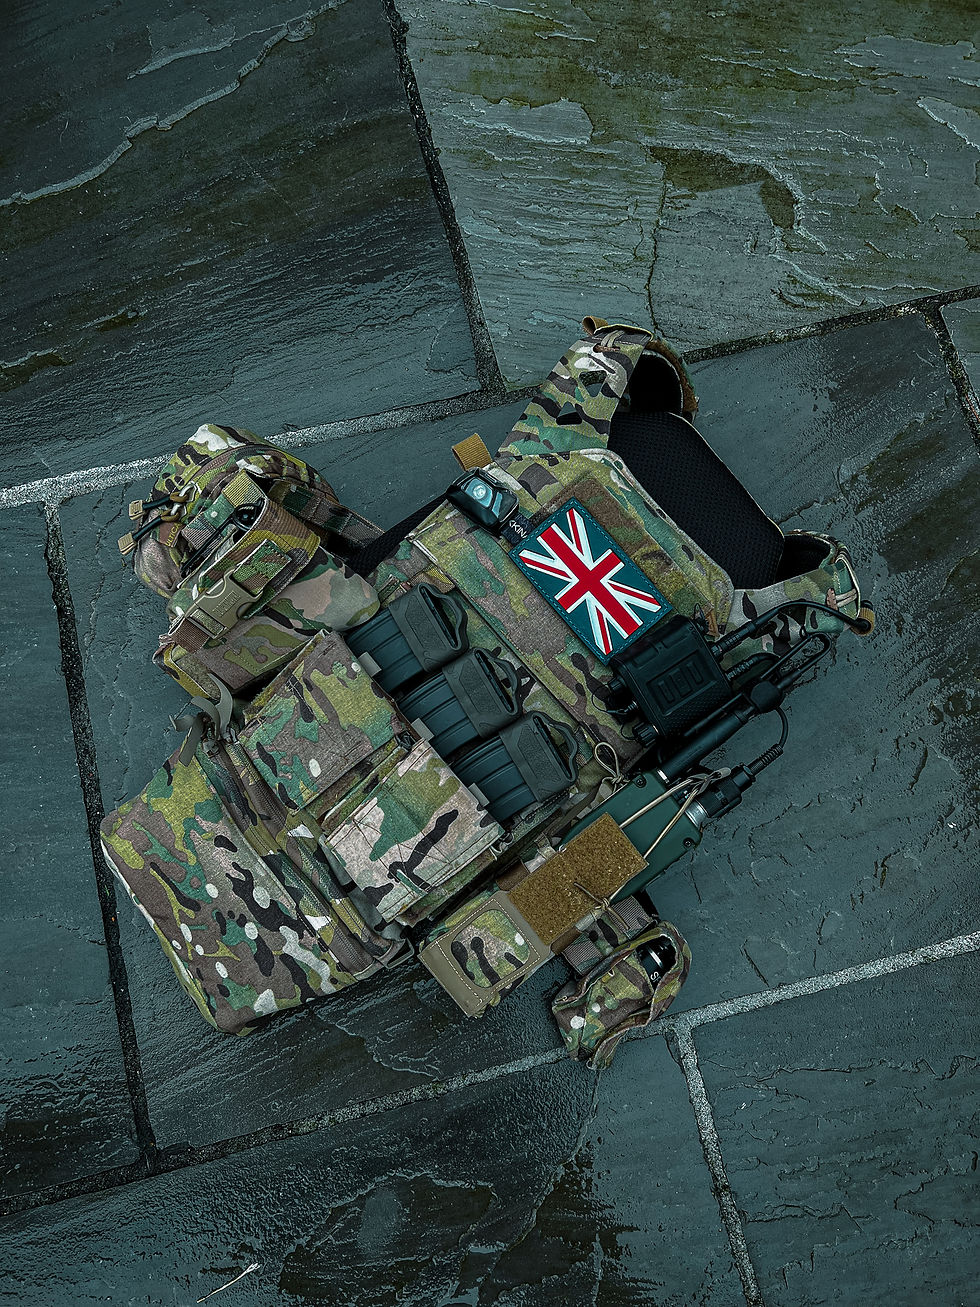
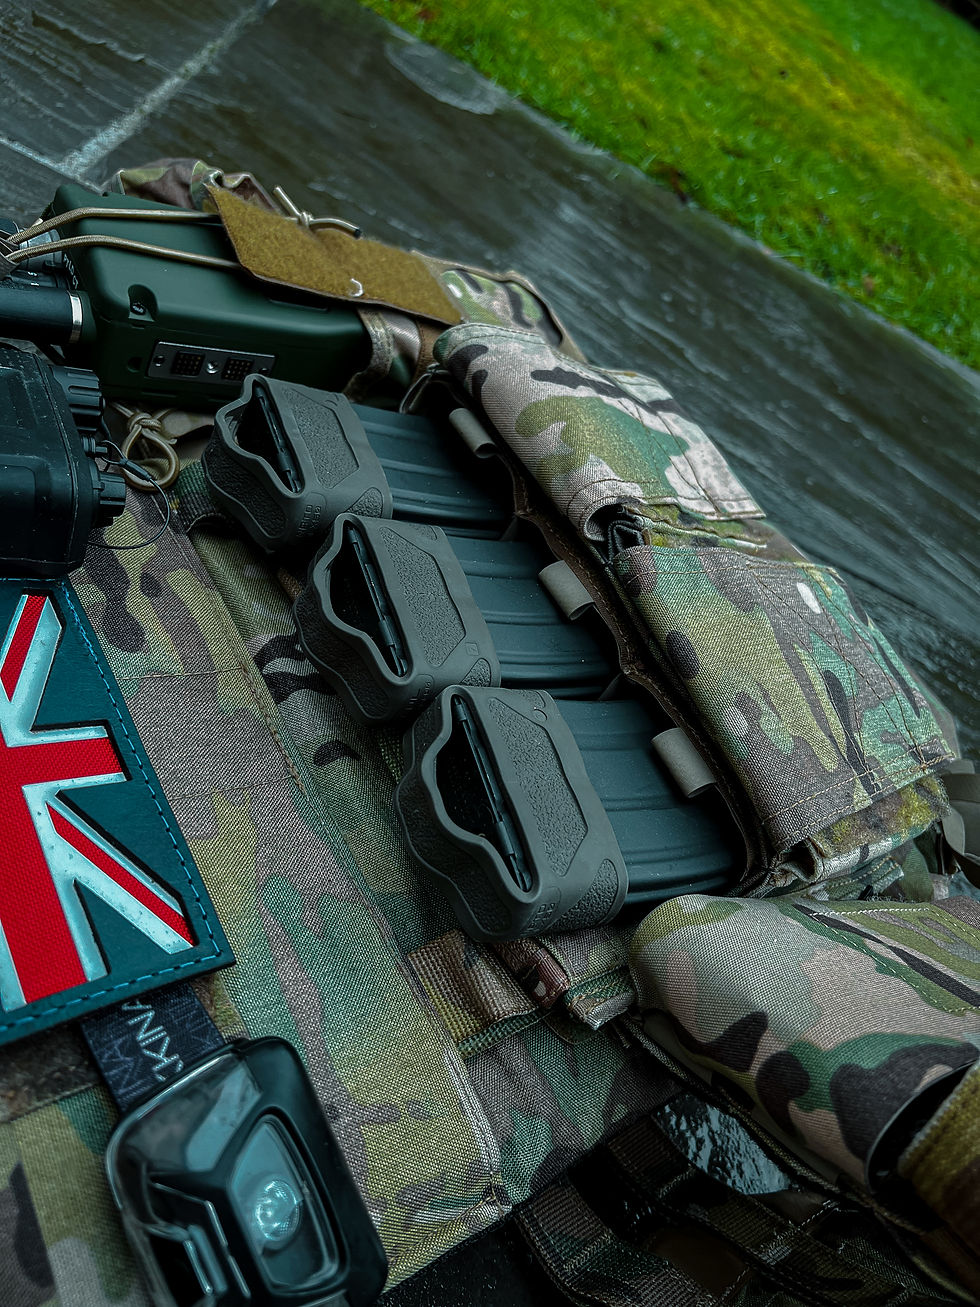
Front plate bag
I’ve currently got the original Fulcrum placard mounted with three rifle magazines in C2R’s kydex inserts. In front of them sits two closed-top pouches – designed for .338 magazines – which make for good storage for fiddly bits. As such, primers and charges for my reusable grenades live in one side; the other is reserved exclusively for the noble purpose of snack carrying. The large, zipped compartment behind the magazine pouches is also a great place for things like maps and notepads. This setup works pretty well for me – I like my magazines being in kydex for the ease of draw and re-indexing making magazine admin a breeze. The one drawback is that I am restricted to only three primary magazines on the front plate bag meaning some necessary overspill of magazines elsewhere. This isn’t ideal, so I while I really kit the original cummerbund (and will definitely keep it for use where I don’t need so many rifle magazines), I’ll probably change the placard setup in time to be able to run four rifle mags up front. The Haley Strategic x Onward Research TRMP is currently in pole position, but at £120 it’s far from a cheap option. An update will follow once I’ve decided on a new setup here.
Completing the load-bearing element of the front plate bag is the C2R abdominal dangler pouch. This was very kindly sent to me as a gift (unsolicited) by C2R, which I should obviously disclose from the off, but it has made a very useful addition to the carrier which I’d never otherwise have considered.
I’ll typically chuck a bottle of water in there, and (while I’m vacillating over a new placard setup) I usually put a rifle mag in there too which I can then administratively load into a pouch when I’ve cycled through a few mags. It’s also a great place to throw grenade pins and spent BFG parts in a hurry.
I keep a Petzl Tikkina headtorch strapped around the top of the plate bag. This was something I initially saw on a couple of real-world setups (I’m looking at you, flannel daddy), but proves extremely useful for tasks like reloading BFGs, or giving my buddies some white light on the fly without having to point a gun at them (like at Caerwent in 2017 when a teammate woke me up for my shift on stag with his MP5 in my face because it was his only torch…). Also adorning the top of the plate bag is a large union flag patch. Most of the time I will wear a hand-crafted dyed leather union flag patch made by Invictus Morale, also (full disclosure) kindly sent to me as a gift by C2R. Where camouflage is particularly important, I will sometimes sub that out for a more muted Multicam alternative. Finally, my PTT also lives up front, but I’ll cover comms separately below.

Cummerbunds
Starting with the left cummerbund, first up is my radio (the TCA PRC 152), in an improvised pouch setup. The pouch is actually a Blue Force Gear double M4 magazine pouch, to which I have attached some shock cord and a pull tab (originally from the Fulcrum placard). The reason for the redneck setup is that I’ve not totally decided how I’ll have the radio setup configured in the long term, so I don’t want to ball out on a gucci radio pouch before I’m set on how I’ll run it. Immediately next to that is (as I remember it) a Molle Monkey Tactical replica of a Crye Precision 330D pistol magazine – I actually found this at the bottom of an old kit bag from before my hiatus, so apologies if I’m mistaken as to its identity). One of my Torc Precision SF-DI impact grenades fills it out perfectly, or my Leatherman Surge can be thrown in there in a pinch.
The right cummerbund starts with a C2R closed-top single rifle magazine pouch for off-hand reloads, followed by a Blackhawk! flashbang pouch which plays host to my Thomas Lowe Defence GR60 distraction device. I will do a separate article altogether on reusable pyro in airsoft and how devices like the GR60 functions, but I’ve had GR-series bangs for years and found them to be some of the best devices in the game – at sites which permit their use, that is. Further back on the right cummerbund is the Crye Precision 6x6x3 general purpose pouch, from Crye’s ‘Smart Pouch Suite’. It carries stuff which I want on my person, but which I’m unlikely to need to access very quickly. That includes my boo-boo kit (think plasters, blister plasters, butterfly stitches, antiseptic wipes and the like) and the SSE bag included with the pouch – I deliberately don’t pack this out all the way so I’ve got some extra GP space free if I need it.


Rear plate bag
The rear plate bag of the Fulcrum is currently slick as I await the back panel options that C2R are due to release for this plate carrier before deciding how I want to set it up in the long term. Depending on the product line-up released by C2R, I would hope to be able to run a ‘breacher’ type setup with space for bolt cutters or a Halligan bar, some buddy-access bangs and other bits and pieces. An update will, of course, follow. Adorning the Velcro-covered MOLLE area at the very top of the rear plate bag, though, is the very zeitgeist-ey Blackbeard patch, immortalised by Christian Craighead – ‘Obi-Wan Nairobi’ – after during the 2019 DusitD2 complex terror attack in Kenya. I do have a spare LBX double bang pouch somewhere, so I will probably swap the patch out for this until I can get the panel sorted.
The belt
There are myriad two-part shooter belts now available on the market, many of which are excellent options. Having previously used quite a lot of Ferro Concepts kit, and based on its widespread acclaim, I was initially looking at their Bison belt (but hot damn that thing is not cheap). C2R also make a well-regarded belt system (which, admittedly, would have fitted in perfectly with my Fulcrum setup), but I was offered a Ronin Tactics Senshi belt at a price I couldn’t refuse from a close friend and swooped on that knowing its pedigree in the industry. Again, a full review will come after I have had more time on it.
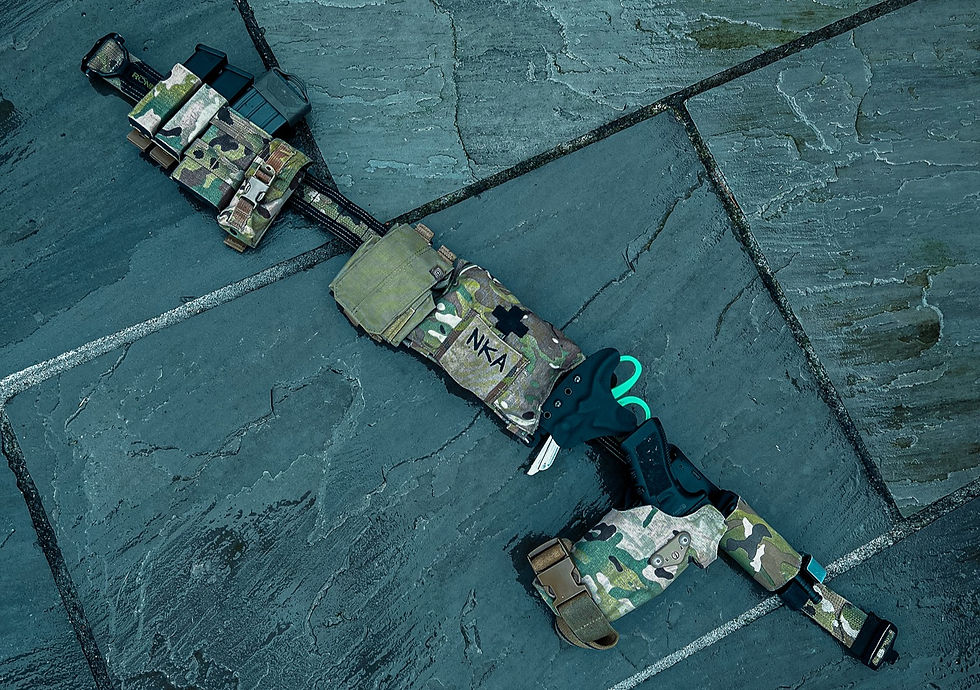

Working from left to right anticlockwise, then, we start with a dual ESSTAC KYWI pistol magazine pouch sitting in front of a single KYWI rifle magazine pouch. In terms of the brand choice, ESSTAC make excellent kydex pouches and I’ve had fairly extensive use of them in the past, so it was an easy decision to use them again with this loadout. Kydex is a must on my belt line for two reasons. Firstly, my belt is my main emergency reload location: when I hit bolt lock it is the first place that I’m going to grab at to reload. Kydex means no straps or pull-tabs to deal with before you can access the magazine. Secondly, by corollary, being able to administratively reload into my belt is important to keep that system operating as smoothly as possible. Kydex, of course, doesn’t close on itself when empty, making that significantly easier. Behind the rifle mag sits a TYR Tactical flashbang pouch, which usually carries an SF-DI impact. The SF-DI is a weighty chunk of milled metal – as is the GR-60 – so you’ll notice that all of the pouches for my re-usable grenades are closed top, secured either by Velcro (the MMT 330D), a small fastex buckle (the Blackhawk!) or both (the TYR).
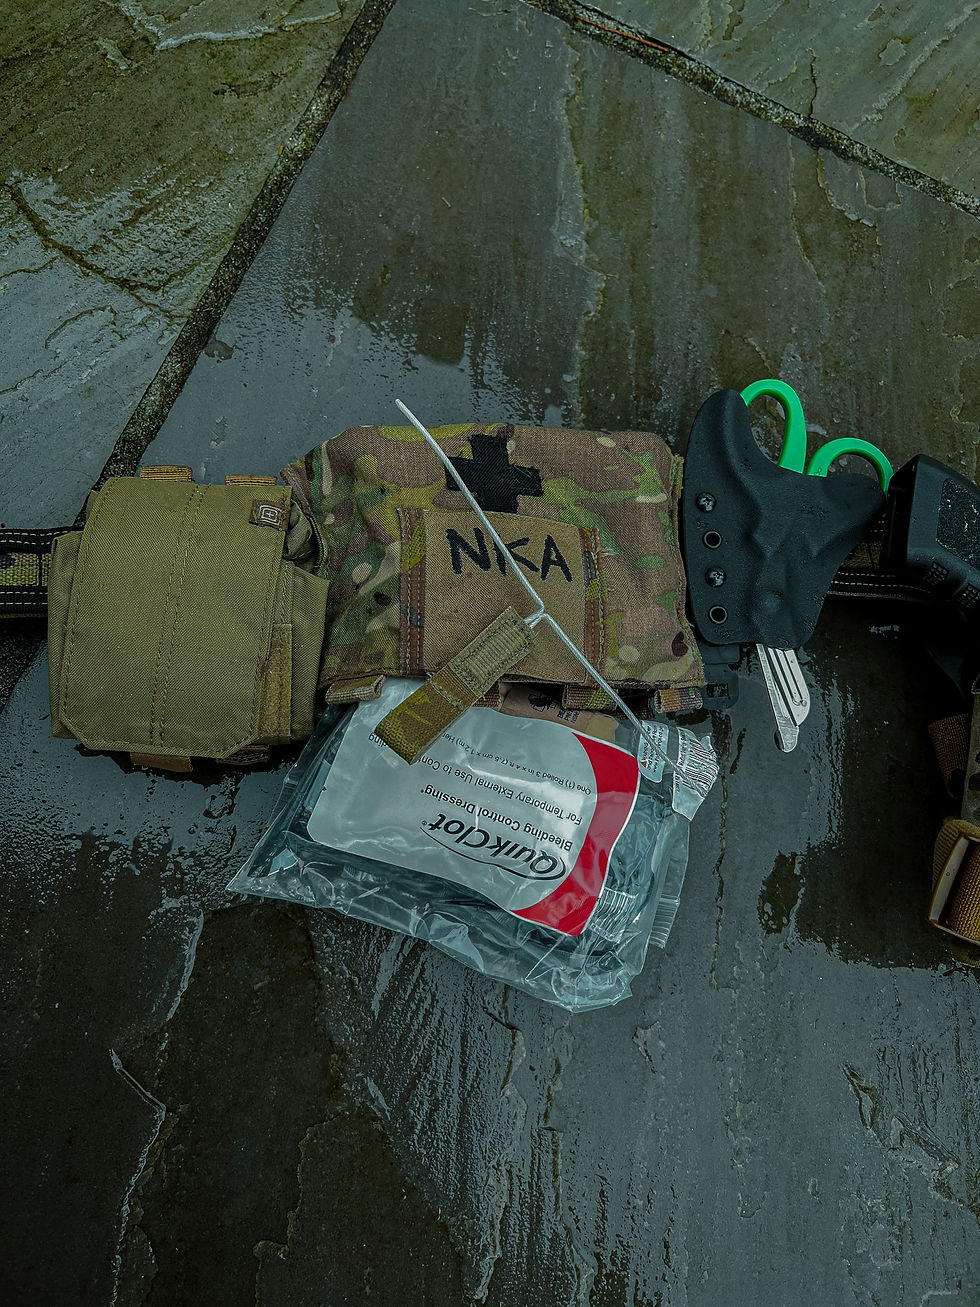
Getting now to the middle of the belt, next up is my 5.11 Tactical dump pouch. While I don’t use much 5.11 kit generally, I really like the design of their dump pouch – I had this same one on the belt kit of my UKSF impression loadout, and it does the job perfectly for me this time round, too. I prefer dump pouches made of heavier Cordura rather than ultra-lightweight materials, and the 5.11’s ability to pack down when not in use is also nice touch. There is then an LBX replica of the iconic LBT blowout pouch, in which I carry a (basic but functional) blowout kit. I don’t know if I will keep this pouch setup in the long term – I may swap the pouch out for a setup which has the contents secured to an insert which keeps it organised (but still immediately accessible) when deployed. Immediately to the right of the blowout pouch is currently a sheath for trauma shears – this is another element of the belt that may change in time, as I may put a knife in this space or even just leave it empty I normally keep a pair of black shears in here, which I conveniently lost right before doing all the photography for this article, so my spare bright green pair had to stand in for the photoshoot.
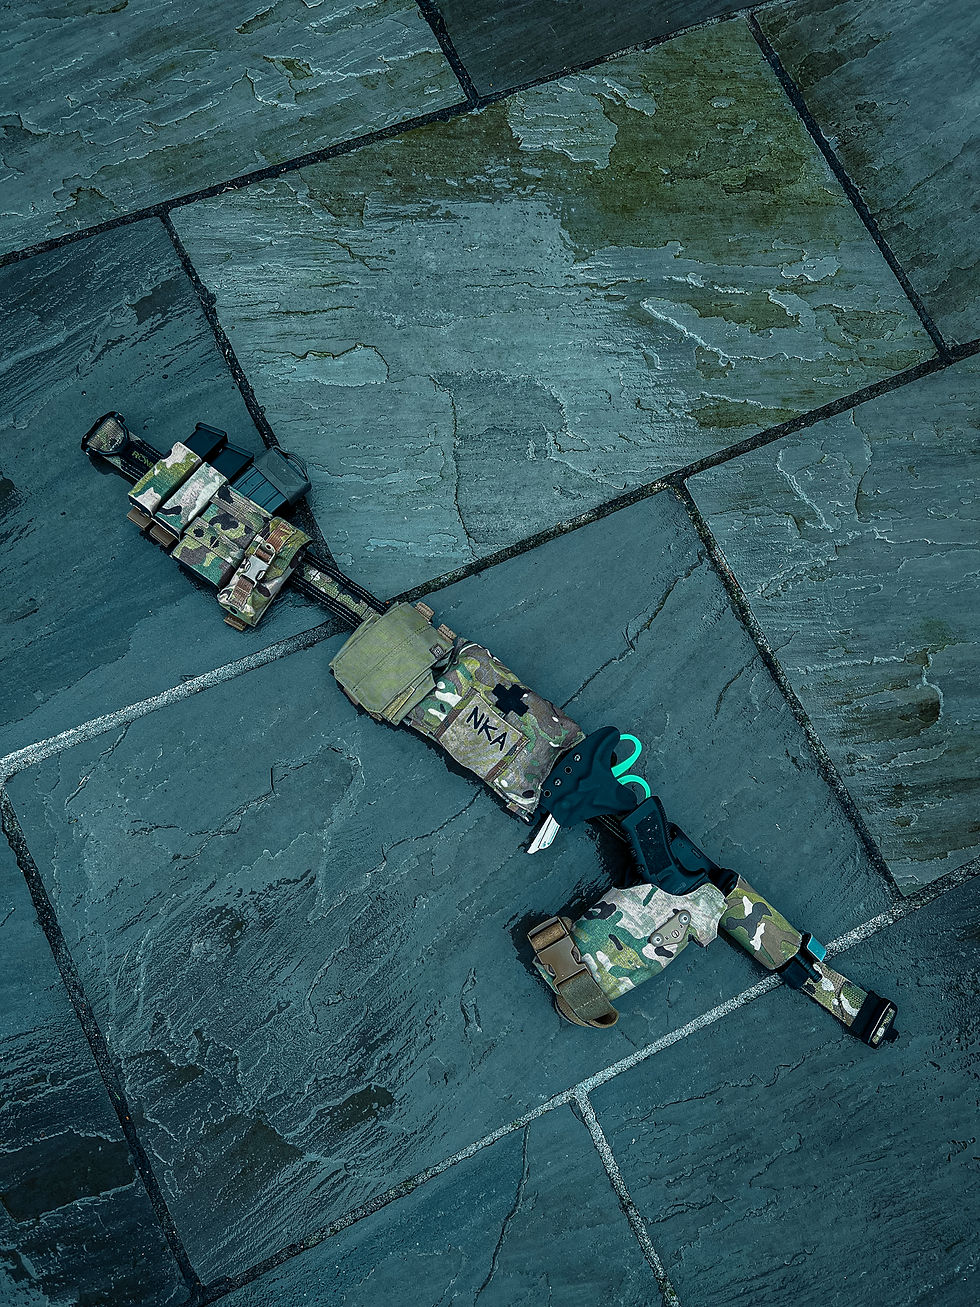
There is a little bit of space right behind my holster setup, which I leave clear to avoid the risk of my sidearm getting caught up as I draw or holster it. The holster itself is the Safariland 6354DO, which I have mounted on a mid-ride panel with the UBL quick-detach system installed. I will, in the future, write an article dedicated to holster setups where this will feature heavily. In summary, though, I personally think this is one of the best overt, active retention holster setups which is currently commercially available. The mid-ride panel sits at a perfect height, and the holster itself is phenomenal in every department. While far from essential, the UBL QD system is a lovely added extra – both for comfort when seated, for example, and also to enable an easy switch between mounting platforms as required. The only item which sits in front of the holster is a Gen 7 Fenton Pharmaceuticals Combat Application Tourniquet, or ‘CAT’. While CATs are a great low-cost, low-bulk way to add a dimension of realism to an airsoft loadout, they are also functional. Firstly, certain MilSim events use CATs (applied gently, obviously) in their medic rules. There are also plenty more ways to f*ck yourself up enough to need a tourniquet than a gunshot wound or explosive blast (think a compound fracture or deep laceration causing arterial bleeding), so I always carry at least one functional tourniquet in case I am ever on the wrong end of an injury like that – I would tend to say that, if you’re carrying a tourniquet on your kit, it’s as well being a real one rather than a fake. Just in case.
Keeping it brief
That’s all for Volume 1 of my DA kit as it currently stands. You can read Volume 2 – which covers footwear, comms and PPE – HERE.

Comments